Pages

Sunday, December 25, 2011

Merry Christmas Cake Pops


I made four different desserts for Christmas Eve dinner last night and these cake pops were the overwhelming favorite. They were super rich and chocolate-y, perfect for anyone with a major sweet tooth. I made the cake and frosting the night before, froze the pops, and decorated them the next morning with the help of my brother and sister.

In light of the holiday, I'll fill this post with photos instead of words. Merry Christmas and Happy Holidays!

Conor and Megan showing off their decorating skills.


Merry Christmas Cake Pops
Makes: 30-40 pops  Prep: 1 hour  Total: 24 hours

Ingredients
Boxed chocolate cake (or favorite chocolate cake recipe)
2 8-ounce cream cheeses
1/2 cup butter
2 cups powdered sugar
1 1/2 tsp vanilla
Red and green candy melts
30-40 lollipop sticks

Directions
Bake cake as directed and let cool. Crumble cake into a large bowl and set aside.
In a medium bowl, combine cream cheese and butter until smooth. Slowly add 1/2 cup of powdered sugar at a time and stir until incorporated. Add vanilla and whip for 2-3 minutes until the frosting is light and fluffy.
Combine the cream cheese icing with crumbled cake and stir until the mixture is smooth. Form into 2 inch balls and set onto a baking sheet with parchment paper. Place sticks into the center of the balls so they look like upside-down lollipops. Refrigerate overnight.
Place candy melts in the microwave for 1 minutes. Remove and stir, and microwave again at 30-second increments until fully melted. Dip cake pops into the melted candy and decorate with additional frosting. Store pops in an airtight container until ready to serve.

Thursday, December 22, 2011

Raspberry Almond Thumbprints


I've decided that December will be a month of cookie recipes. With only three days left until Christmas, cookies are kind of the only thing on my radar. Today I had my best girlfriends over to bake and decorate cookies. Of course, we had to devour some brie and queso dip before getting started. Seriously, every party we have involves cheese... probably not normal. Anyway, I whipped up a few batches of these thumbprints (based off of my grandma's recipe) and my friends made some classic sugar cookies. Here are the prettiest cookies of the bunch:


It's funny how we spend so much time shopping and getting ready for the holidays, but the best moments are simply sitting around with your best friends and family. I moved to Boston several years ago, but somehow I still find the same charms every time I come home. As I write this I'm listening to "Love is Christmas" by Sara Bareilles, so perhaps that's why I'm feeling so introspective. To wrap this up, when you're running around this holiday season don't forget to slow down and enjoy the people around you. And also have a cookie. :)

Raspberry Almond Thumbprints
Makes: 1 dozen cookies  Prep: 10 minutes  Total: 20 minutes

Ingredients
1/2 cup butter
1/4 cup brown sugar
1/2 tsp vanilla
1 egg, divided
1 cup flour
1/4 tsp salt
3/4 cup slivered almonds, chopped
1/4 cup raspberry jam

Directions
Mix butter, brown sugar and vanilla in a medium bowl. Crack the egg and separate the white from the yolk, saving the egg white in a small bowl. Add the yolk to the sugar mixture and mix well. Add flour and salt and mix until fully incorporated.
Lightly whisk egg white. Roll dough into 1-inch balls and dip into egg white. Roll into finely chopped almonds and place on a greased baking sheet. Press thumb into the center of each cookie and bake at 375 for 10 minutes or until the dough is set. Remove and let cool. Fill each cookie with raspberry jam and store in an airtight container until ready to serve.

Monday, December 12, 2011

Cranberry Rocky Road Cookies: The Great Food Blogger Cookie Swap!


Happy holidays, everyone! :) I'm back home for winter break and have one online final and a paper before I'm officially done with this semester. I've already moved out of my Boston apartment and will soon be making my journey to The Middle-of-Nowhere, New Jersey for a 6-month internship. I said my bittersweet goodbyes to all my amazing Boston friends this weekend, and I have to say this has been the best semester EVER. I made some wonderful new friends and got even closer to old ones, which makes it terribly hard to leave. Love you all so much, and thanks for an incredible year!

On the bright side, a few positives of leaving Boston are 1) a great new job, 2) [hopefully] great new friends, and 3) more time to blog!!! Which brings me to...

The Great Food Blogger Cookie Swap
 This year two amazing food bloggers, Julie at The Little Kitchen and Lindsay at Love & Olive Oil, arranged an international cookie swap for food bloggers to network, exchange information, and best of all, cookies! I can't think of a better and tastier way to connect with other bloggers out there.

I was scrambling to come up with a recipe for this event, since I usually don't ad lib on baking recipes, but I was really stuck on the idea of chocolate and marshmallow because it was my favorite ice cream as a kid. Somehow this transitioned to rocky road, then dried cranberries were thrown in the mix, and huzzah! Cranberry rocky road cookies were born. These were very quick to whip up and are the perfect holiday cookie for both chocolate lovers and fruity dessert lovers to enjoy.


Cranberry Rocky Road Cookies
Makes: 4 dozen cookies  Prep: 15 minutes  Total: 30 minutes

Ingredients
1 cup butter
1 1/2 cups sugar
2 eggs
2 tsp vanilla
2 cups flour
1 tsp salt
3/4 cups baking soda
2/3 cups cocoa
1 cup chocolate chips
1 cup dried cranberries
1 cup mini marshmallows
1/2 cup walnuts, chopped

Directions
Preheat oven to 350.
Place softened butter in an electric mixer and beat for 30 seconds until whipped. Add in sugar, eggs and vanilla and beat for 1 minute. In a separate bowl, combine flour, salt, baking soda and cocoa and mix well. Add dry ingredients into the mixer in four parts and beat for 2 minutes.
Next, chop whole walnuts before measuring. Add walnuts, chocolate chips and dried cranberries into the cookie dough and beat for 1 minute.
Scoop dough with a tablespoon and place on a greased baking sheet. Bake for 12 minutes or until the dough is risen and remove from the oven. Add a few mini marshmallows to each individual cookie. Bake for another 2 or 3 minutes, remove from the oven and let cool.

Wednesday, November 30, 2011

Duck Pot Pie with Sweet Potato


Sorry this recipe is a bit delayed. I've been cooking so much recently but have hardly had time to post anything! Anyway, my friends in my musical theater group will recognize this pot pie because I spent a day preparing to make it, only to realize I had a 3 hour rehearsal that night and would have to delay the meal. I was quite traumatized by this, but was fortunately free to bake and eat this delicious pot pie the next day.

I had an urge to make meat pot pie after my mom sent me a picture of a yummy-looking chicken pot pie she made earlier this month. (We swap cooking stories a lot.) I knew I wanted to use sweet potato, and after much thought I set my mind on duck as the meat for this unique pie. I walked down to Chinatown with Dylan and my roommate Katie to get dim sum and hunt for duck meat. Fortunately, I was able to buy half a cooked duck in a little shop directly across from the restaurant we found. The most time consuming aspect of this recipe was picking the duck meat off the bone, but once that's over the rest is easy and the final product very delicious!


Duck Pot Pie with Sweet Potato
Serves: 8  Prep: 30 minutes  Total: 1 hour, 15 minutes

Ingredients
1/2 duck (approximately 3 cups duck meat)
1 ready-rolled pastry puff
2 sweet potatoes, peeled and cubed
1 1/2 cups carrots, chopped
1 1/2 cups mushroom, chopped
1 onion, chopped
2 cups frozen peas
1 tbs thyme
6 tbs butter
6 tbs flour
4 cups low-fat milk
1 tsp salt
1 tsp nutmeg
1 egg (optional)

Directions
Remove duck meat from the bone with a small knife or by hand. Be sure to remove small bones and all excess fat from the meat. Set aside.
Combine sweet potato, carrots, mushroom, onion, peas and thyme in a large saucepan. Fill with water up to the top of the vegetables. Cover and simmer for about 10 minutes or until the potato is slightly softened. Drain and let cool.
In a medium pot, melt butter on medium-high heat and add flour to begin the béchamel sauce. Cook for 5 minutes, stirring occasionally until the mixture is golden and thickened. Heat the milk separately and add in 4 different increments, bring to a boil and let simmer. Add the salt and nutmeg and remove from heat.
In a large baking dish, combine vegetables, duck meat and the béchamel sauce. Cover with pastry puff and brush a whisked egg on top for an egg wash if desired. Cover in foil and bake at 350 for 30 minutes. Remove foil and bake for another 15 minutes. Remove and cool before serving.

Tuesday, November 15, 2011

Pumpkin and Chocolate Cheesecake Bars


It's been a very beautiful fall in Boston so far (...minus the snowstorm on Halloween weekend, but let's forget about that). Luckily I live in an area with parks and plenty of trees, which means I still get to enjoy the changing of leaves. There are so many leaves left! I'm sure by the time I come back from Thanksgiving break they'll be gone, so I need to enjoy them while they last.

Some of my wonderful friends had a "Fall Festival" party this weekend, so I decided this was a perfect excuse to try a new pumpkin dessert. They had pumpkin pancakes, bagels with pumpkin cream cheese, and apple pie shots (all delicious, by the way). It was a great addition to an awesome weekend following a very stressful week. I find it humorous that people are so grateful when I show up somewhere with food. I don't think my friends realize that if I didn't have them to help me eat the things I bake, I wouldn't end up baking at all. So thanks, guys!


Pumpkin Chocolate Cheesecake Bars 
(Adapted from Martha Stewart Recipes*)
Makes: 16 bars  Prep: 30 minutes  Total: 3 hours, 30 minutes

Ingredients
1 9-ounce package chocolate teddy grahams (or graham cracker equivalent)
1 1/4 cup brown sugar (divided)
1/4 cup butter
2 8-ounce packages cream cheese
1 cup organic pumpkin
3 eggs
3 tbs flour
1/2 tsp salt
1/2 tsp nutmeg
1/2 tsp cinnamon
1/4 tsp ginger
5 ounces semisweet chocolate chips

Directions
Preheat oven to 350. Begin making the graham cracker crust by crushing teddy grahams (or graham crackers) in a bag with a rolling pin into very fine crumbs. Pour into a bowl and mix with 1/4 cup brown sugar and 1/4 cup softened butter. Press into the bottom of a greased baking dish and bake for 10 to 12 minutes. Set aside.
In a large bowl, combine softened cream cheese, 1 cup brown sugar, and organic pumpkin. Mix until softened. Add eggs and flour and stir until the eggs are fully incorporated. Season with salt, nutmeg, cinnamon and ginger.
Place semisweet chocolate chips in a microwaveable bowl and heat in 30-second increments, stirring in between, until melted.
Pour half the cheesecake mixture over the graham cracker crust and spread evenly. Combine the melted chocolate with the remaining cheesecake mix and stir once or twice. Pour in small dollops into the prepared pan and using a butter knife, very carefully swirl the chocolate and cheesecake in a figure eight pattern to create a nice design.
Bake for 45 minutes at 350. Remove and let cool. Cover and chill for at least 2 hours prior to serving.

*I found the original recipe on Martha Stewart, but made some changes to the cheesecake mix and used my own graham cracker crust. View the link above for the original recipe.

Wednesday, November 2, 2011

Pumpkin Baked Ziti


For those of you who don't know me personally, I'm somewhat holiday-obsessed. Every Halloween, I carve pumpkins. Every Easter, I dye Easter eggs. And every time Christmas rolls around, you bet I'm sitting on the floor of my apartment cutting out paper snowflakes instead of studying for finals. Many of my friends say they hate holidays, and that after childhood the excitement wears away and the fun is gone. Maybe I'm just 9-years old at heart, but I think I will always perform these rituals because I grew up with them, they connect me to home, and make me feel closer to the people around me. Call me lame, but while the holiday naysayers are complaining, I'm skipping around having the time of my life!

I concocted this dish about two weeks in advance before my Halloween party, and it came out just as I'd hoped. I've never been a big marinara fan, so I created my own pasta sauce using organic pumpkin, vegetable broth, onion, cream, brown sugar, nutmeg, and cayenne pepper. I made 2 pounds of pasta to serve a big group of people, but scaled down the recipe for 1 pound which can easily feed a family, small group of friends, or a single person who loves leftovers! I guess cannibalistic pumpkins can eat it, too?


Pumpkin Baked Ziti
Serves: 4-6 people  Prep: 40 minutes  Total: 1 hour, 10 minutes

Ingredients
1 lb whole wheat rotini pasta
1 yellow onion
1/2 tbs brown sugar
1/2 tbs nutmeg
1/2 tsp cayenne pepper
1 15-ounce can organic pumpkin
1 cup vegetable broth
1/4 cup heavy cream
1 1/2 tbs fresh thyme
10-ounces gruyere cheese (shredded)
1/2 cup parmesan cheese
1/2 cup whole wheat bread crumbs

Directions
Cook rotini in a large pot as directed until al dente. Strain and set aside.
Dice onion and saute in olive oil on medium heat until tender, about 3 minutes. Add brown sugar, nutmeg and cayenne pepper and cook for another 2 minutes. Stir in pumpkin and vegetable broth, bring sauce to a boil and simmer uncovered on low heat for 15 minutes. Pour in heavy cream and stir well. Add thyme and simmer for another 20 minutes. When the sauce is done, remove from heat and let sit.
Begin assembling the zita by layering a greased baking dish with half of the rotini pasta, half of the sauce, and half of gruyere. Again, layer half the pasta, sauce and gruyere. Top with parmesan and bread crumbs. Bake at 350 degrees for 30 minutes or until the cheese is fully melted and the top is slightly browned.

Tuesday, November 1, 2011

Slow Cooker Pulled Pork Sandwiches


Happy November, everyone! I can't believe how fast this semester is flying. In a little over 2 months I'll be moving out of Boston and working full time for Johnson & Johnson in New Jersey until July. So crazy how fast this is sneaking up on me! I had an amazing dinner party for Halloween with some girlfriends last night, and it made me even sadder to leave this city. I'm planning to squeeze in all the dinner parties I can before I move, so get excited for a lot more posts to come.

This was the main dish I served for the Halloween party my roommates and I threw yesterday evening. I woke up at 7 to put the pork in the slow cooker before my 8 am class, then took it out at 7 pm right before the party started to shred the meat and add the sauce. I swear by Dinosaur Bar-B-Que sauce, and since the original restaurant is in my hometown I'm a devoted fan.

Also, I definitely recommend cooking the pork for the full 12 hours because the meat literally melts in your mouth. Considering we fed about 12 girls (and 2 lucky boyfriends) I'd say this is the easiest and most delicious go-to party meal I can think of!

Here are some quick shots of the party:

Some of the girls
Snapshot of the dinner
Feeling a little full...
Dylan and me

Hope everyone else had a great Halloween weekend. Enjoy!


Slow Cooker Pulled Pork Sandwiches
Makes: 12 sandwiches  Prep: 20 minutes  Total: 12 hours, 20 minutes

Ingredients
5-6 lbs pork shoulder
1 large onion
4 tbs red pepper flakes
4 tbs paprika
3 tbs salt
3 tbs pepper
2 19-ounce bottles of Dinosaur Bar-B-Que sauce
Sandwich buns

Directions
Slice the onion through the center to create large rings of onion. Lay in the bottom of the slow cooker.
Prepare BBQ rub by combining red pepper flakes, paprika, salt and pepper in a small bowl. Pat the rub all over the pork shoulder, covering evenly. Place the pork on top of onion and fill the slow cooker two-thirds of the way with water.
Turn the slow cooker to low and leave on for 10-12 hours.
When the pork is done, remove from the slow cooker and shred with two forks. Place pulled pork in a large bowl and add 1 bottle of Dinosaur Bar-B-Que sauce. Mix well.
Dump most of the water and juice out of the cooker, leaving 1/4 cup and onions for flavor. Add the pulled pork back into the slow cooker and keep on low until ready to serve.

Thursday, October 13, 2011

Butternut Squash Bisque with Granny Smith Apple and Maple Bacon


Today is a gross, rainy day in Boston and I'm still sniffling from a cold I got two weeks ago. Yuck. Tis the season, I suppose. In the midst of my sickness and feeling very under the weather, I decided to cheer myself up by making this soup. One of my favorite things about fall is butternut squash, and I've been meaning to make a roasted squash soup for a while. Since I don't have a food processor at school yet (wink wink Mom and Dad...) this came out as more of a bisque, which I actually liked better. Pureeing the vegetables too much creates a runny consistency, so blend or puree on low to achieve a thicker base.

You can easily make this recipe vegetarian by replacing the chicken stock with vegetable stock and nixing the bacon. If you aren't a vegetarian though, I strongly recommend the maple bacon. The sweetness accompanied the green apple very nicely and it gave the soup a little extra texture. Also, if you plan to make a big batch and freeze it, hold off on adding the sour cream until the soup is reheated and ready to serve.


Butternut Squash Bisque with Granny Smith Apple and Maple Bacon
Serves: 6-8  Prep: 30 minutes  Total: 1 hour, 30 minutes

Ingredients
1 butternut squash
1 granny smith apple (cored, peeled and chopped)
1 yellow onion
1 carrot
3 tbs butter
Salt and pepper to taste
1 tsp red pepper flakes
2 cups chicken stock
3 tbs low fat sour cream (plus more for garnish)
6 strips maple bacon

Directions
Cut the butternut squash in half, brush with olive oil, and roast on the top rack at 400 degrees for 30-40 minutes, or until the squash is tender. Remove and let cool.
Melt butter in a large saucepan on medium heat. Add the chopped onion and carrot and cook until the onion is soft, about 4-5 minutes. Add the chopped granny smith apple and cook for another 3-4 minutes. While the apple is cooking, scoop the contents of the butternut squash out of its skin, removing the seeds in the process. Add squash to the saucepan and season with salt, pepper and red pepper flakes. Mix well.
Remove the squash mixture from the saucepan and place into a food processor or blender. Mix on low until the mixture develops a bisque consistency, well blended but not smooth.
Place the squash mixture into a pot and add the chicken stock. Cook uncovered on low heat for 20 minutes, stirring occasionally. While the soup is simmering, fry the maple bacon on the stove, then remove and drain the grease on paper towels. When cooled, chop the bacon for garnish.
Add sour cream into the soup and stir well. Remove from heat and serve. Garnish with 1 tablespoon of sour cream and 1 tablespoon of crumbled maple bacon.

Tuesday, October 4, 2011

Grandma's Apple Cake


When my friends find out I can cook or taste my food for the first time, it's pretty common that they ask if my mom or grandma are also good cooks. I guess people assume every good home cook has good (but most likely better) home cooks in their family. My mom's recipes are the reason I started cooking in college in the first place, but many of her best dishes come from her mother, my grandma.


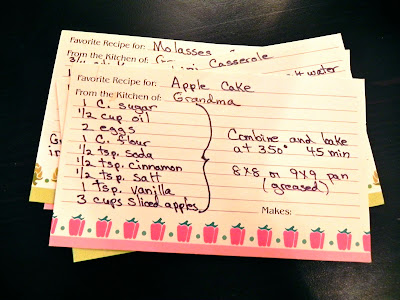
Last year I moved into my first college apartment with a full kitchen and I asked my grandma (who has lived 5 minutes down the road from me my whole life) if I could take some of her recipes to school. She happily obliged, and not only filled out these adorable recipe cards, but also went through her own kitchen and gave me tons of extra pots, dishes and accessories to stock up my kitchen. When someone digs through my kitchen cabinets and makes a joke about my 60's-looking casserole dish, retro spoon rests, or tea bag holders (see below), I charmingly reply that they were once my grandmothers and she passed them down to me along with her recipes to keep our family cooking alive.


I've made my grandma's apple cake twice in the past week because it keeps disappearing between friends and roommates who want a "taste". If you have a lot of apples lying around your fridge or want a classic fall dessert, try this cake recipe and I bet you'll be baking a second very soon.


Grandma's Apple Cake
Serves: 8  Prep: 15 minutes  Total: 1 hour, 15 minutes

Ingredients
1 cup sugar
1/2 cup oil
2 eggs
1 cup flour
1/2 tsp baking soda
1/2 tsp cinnamon
1/2 tsp salt
1 tsp vanilla
3 medium apples

Directions
Set oven to 350 degrees.
Mix all dry ingredients together in a large bowl. Add eggs, vanilla and oil into the batter and mix well. Cup up the apples into slices, then into small cubes. (Peel the apple skin if desired, but I prefer to leave it on.) Add the apple into an 8x8 inch greased cake dish and bake for 45 minutes to 1 hour, or until a toothpick comes out dry.

Friday, September 30, 2011

Pesto Chicken Burger Sliders with Roasted Red Pepper and Pesto-Hummus


Alright, I'm going be blunt. I'm pretty proud of this one. This was another instance of some weird culinary vision that I created in my head and couldn't seem to shake until I saw it executed. My first thought was to make chicken burgers, since I'm steering clear from red meat for a while but really love burgers. (This? And this?! I've made my case.) Then immediately I thought, "You know what I love more than burgers? Burger sliders!" I don't know what it is, but they're just so damn cute! And juicy. And you're eating less, even if you have four of them, right?

Anyway, Dylan and I made these last Friday before going out, and when I say they were amazing, that's an understatement. The pesto and lemon hummus spread is the perfect melt-in-your-mouth topping for these succulent chicken burgers, and the slightly warmed, soft ciabatta rolls made the whole burger literally melt with each bite. The best way to sum up these burgers is to quote Dylan's reaction. He's fairly honest with my cooking, and he never gushes unless I really hit the jackpot. So when he said, "I don't even want to go out anymore because this is already the best part of my night," I knew I found a recipe (and a boy) worth keeping.


Pesto Chicken Burger Sliders with Roasted Red Pepper and Pesto-Hummus
Makes: 5 sliders  Prep: 15 minutes  Total: 30 minutes

Ingredients
1 lb ground chicken
1/2 cup pesto
3 tbs egg whites
Salt and pepper
6 tbs lemon hummus
5 large roasted red peppers
5 mini ciabatta rolls

Directions
Combine ground chicken, egg whites, and 2 tablespoons of pesto into a medium bowl and mix with hands. Season with salt and pepper to taste. Once incorporated, form the meat into 5 mini burger patties. In a large skillet, fry the burgers for about 10 to 15 minutes, or until the meat is fully cooked and the juices run clear.
For the pesto and lemon hummus spread, combine the remaining pesto (6 tsp) with the lemon hummus. Before serving, briefly warm the ciabatta rolls in the oven and layer a generous amount of the hummus spread on the top bun. Assemble the burgers and serve with sweet potato fries.

Sunday, September 25, 2011

Citrus Veggie Quinoa Salad


I suppose you can't really have a food blog these days and not have at least one post about quinoa, right? If you've never had quinoa, there are a few things you need to know:

1) It's pronounced "KEEN-wah", not "ki-NO-wah" or "qui-NO-wah" or any other easily mistakable pronunciation.
2) Quinoa became very popular because of influential food bloggers like Heidi Swanson, who turned an unusual grain into a multi-functional health food staple.
3) Quinoa is kind of a grain, but kind of not. It's like a seed, but more like a grain? Whatever it is, it's surprisingly really good.

So, I made a huge batch of quinoa salad to use as a grab-and-go snack, lunch and dinner this past week. Somehow I've managed to eat the same thing all week and not get sick of it, meaning I'll definitely be experimenting with more quinoa recipes in the near future.


Citrus Veggie Quinoa Salad
Serves: 10-12  Prep: 25  Total: 40 minutes

Ingredients
1 pound boxed quinoa
1 yellow pepper
1 orange pepper
1 small eggplant
2 Roma tomatoes
1/2 cup green onion, chopped
lemon juice
olive oil
garlic salt
pepper

Directions
Prepare quinoa on the stove as directed.
In the meantime, chop eggplant, pepper, tomato and green onion. Cook eggplant in a medium skillet until slightly softened, or about 5 minutes. Add the pepper into the skillet and cook for another 3-5 minutes. Lastly, add the green onion and tomato and cook for one more minute. Remove from heat.
When the quinoa is full cooked, add in mixed vegetables and toss with citrus dressing (1 part lemon juice, 1 part olive oil, garlic salt and pepper).

Thursday, September 22, 2011

Pumpkin Blueberry Scones with Blueberry Glaze


I'm finally getting settled into my brand new apartment in Boston. I've hardly had time to buy groceries, let alone cook, which makes me very sad. My new kitchen is very tiny but my roommates and I are making good use of it. Cooking is such a great stress reliever for me, so after this busy week is over I'm hoping to whip up some new creations.

On that note, tomorrow marks the first official day of fall! Fall always makes me a little nostalgic because it reminds me of home. There's nothing like apple picking in New York and watching the beautiful rolling hills change to vibrant shades of orange and red at the peak of the leaves. As an adieu to summer and welcoming for fall, I created this recipe for pumpkin blueberry scones.

Cooking in between seasons is great because you combine produce that's on it's way out with new seasonal flavors. If you're having a hard time letting go of summer cooking, these scones are the perfect in between recipe to bring you around and get you excited for warm, fall comfort foods. Enjoy!


Pumpkin Blueberry Scones with Blueberry Glaze
Makes: 8 scones  Prep: 20 minutes  Total: 40 minutes

Ingredients
Pumpkin Blueberry Scones:
2 cups flour
1/3 cup brown sugar
1/2 tsp cinnamon
1/2 tsp nutmeg
1/4 tsp cloves
1/4 tsp ginger
1 tsp baking powder
1/2 tsp baking soda
1/4 tsp salt
1/2 cup unsalted butter
1/3 cup buttermilk
1/2 cup 100% pure pumpkin
1 tsp vanilla
3/4 cup blueberries

Blueberry Glaze:
1 cup powdered sugar
2 tbs milk
1/4 cup crushed blueberries

Directions
Pumpkin Blueberry Scones:
Preheat oven to 400 degrees and line a baking sheet with parchment paper.
Combine flour, brown sugar, cinnamon, nutmeg, cloves, ginger, baking powder, baking soda and salt in a large bowl. Cut in the butter until it is in pea-sized pieces. Mix in buttermilk, pumpkin and vanilla. Carefully fold blueberries into the dough, trying not to break them.
On a floured surface, knead the dough for 1 minute until semi-firm and moist. Roll the dough into a long rectangle. Cut in half width-wise so the dough is in two squares. Cut each square twice from corner to corner to make 8 triangular scones. Place scones on papered baking sheet and bake for 20 minutes.

Blueberry Glaze:
While the scones are baking, measure out 1/4 cup of blueberries and juice or push them through a strainer to separate the blueberry juice from the skin. Try to remove as much skin as possible in the process. (A little is okay - you want the glaze to be thick.) Combine the blueberry juice with the powdered sugar and milk. Wait until scones are completely cooled before drizzling the glaze on top.

Wednesday, August 31, 2011

Buffalo Chicken Dip with Banana Peppers


Perhaps this is a phenomena that exists only amongst my girl friends at home, but we love dip. We can polish off a bowl of dip so fast that we barely even remember eating it. I decided to come up with my own recipe for buffalo chicken dip, a favorite of my friends, for a girls night at my house. Because really, what goes better with a box of Franzia than steaming hot cheese?

Alright, so this is definitely not the healthiest post I've ever done. However, being from Upstate New York I need to recognize the glory that is buffalo chicken (wings, pizza, sub, you name it - I've tried it). Anchor Bar in Buffalo, New York is credited with the creation of buffalo chicken wings, but I didn't discover buffalo chicken in other forms until I entered college. Buffalo chicken of every variety is my #1 guilty pleasure food.

This dip is perfect for a tailgate or lazy night with friends. Just make sure to wear your turkey pants!


Buffalo Chicken Dip with Banana Peppers
Serves: 10-12 people  Prep: 10 minutes  Total: 30 minutes

Ingredients
1 rotisserie chicken (about 2 cups of chicken meat)
1 8-ounce package of cream cheese
1/2 cup blue cheese dressing
1/2 cup Original Anchor Bar Buffalo Wing Sauce
1 cup banana peppers, chopped or whole
1/2 cup crumbly Gorgonzola
Tortilla chips and celery

Directions
Preheat oven to 350. Remove all the meat off of a precooked rotisserie chicken and chop into medium cubes. Set aside.
In a 9-inch pie dish, combine cream cheese, blue cheese dressing and buffalo wing sauce. Add chopped chicken and banana peppers and mix well. Sprinkle Gorgonzola on top and place in the oven for 20 minutes. Serve with tortilla chips and celery.

Sunday, August 28, 2011

Dinosaur Bar-B-Que Honey Hush Cornbread


Hurricane Irene is hitting most of New England right now, while I sit snuggled safely in my house in Upstate New York. I've been huddled on my laptop all day keeping an eye on the storm and all my friends in Boston. I can't think of a better time to introduce a new recipe dedicated to my second home.

Actually, this recipe pays homage to both my homes, here in Syracuse and back in Boston. Syracuse is pretty quaint as far as cities go, but if we're known for one thing (besides Syracuse University basketball) it's Dinosaur Bar-B-Que. This barbecue joint has been famous since I was born, originating right off of West Gennesee Street in downtown Syracuse, and has since introduced locations in Harlem, Troy, and Rochester.

Dinosaur Bar-B-Que was voted America's Best BBQ in a nation-wide search held by "Good Morning America" back in 2009. It has also been featured on the Travel Channel's show Man v. Food. Dylan and I are in a constant debate about the supremacy of Dinosaur Bar-B-Que, as he is convinced there is no {insert noun} better than the one in DC. I've since gotten him to admit that it is "on par" with his favorite barbecue restaurant in his hometown. I'll accept that as defeat.

Dinosaur Bar-B-Que  Honey Hush Cornbread
Serves: 9  Prep: 10 minutes  Total: 40 minutes

Ingredients
1 1/4 cups yellow cornmeal
1/4 cup sugar
3/4 cup flour
1 1/2 tsp baking powder
1/2 tsp baking soda
1 tsp kosher salt
1 cup buttermilk
2 eggs
1/2 tsp vanilla
1/4 cup butter
2 tablespoons honey*

Directions
Preheat oven to 350. In a bowl, combine cornmeal, sugar, flour, baking powder, baking soda and kosher salt.
In a separate bowl, whisk buttermilk, eggs, vanilla, melted butter and honey. Pour wet ingredients over dry ingredients and mix until moist all the way through.
Pour the batter into a greased 8x8 inch baking pan and bake for 25 to 30 minutes.

*In the original recipe, the honey is brushed on top of the cornbread after baking. I decided to incorporate it into the batter for a richer taste throughout. Either way will do the trick!

Argentine Food Adventures

Hello all! I'm back in the States from an amazing trip to Buenos Aires, Argentina. My hopes to food blog while away, to put it bluntly, failed. Between classes, being with my peers and seeing the city, there wasn't much room for personal downtime. And what little downtime I did receive, you can bet I was napping.

Before I continue with my regular recipe sharing, I want to fill you in on some highlights of Argentine cuisine.

Carbs

Most meals I ate in Argentina or received from my host family were loaded with carbohydrates. A standard day of meals would consist of a medialuna for breakfast (pictured above), empanadas for lunch, and a plate of polenta for dinner. There were so many carbs, in fact, that one was left wondering how everyone in this country was skinny. Because of the winter season, you would be hard-pressed to find an appealing variety of produce in the city, let alone one decent tomato. Since empanadas (pies filled with meat and cheese) were the cheapest option, they became a lunchtime staple amongst my fellow students.

Beef

Argentine beef is certainly something to brag about. The grass fed cows produce a richer, more tender cut of meat. One of my best meals in Argentina was a fat cut of beef I had at a traditional tango show that almost put me in a red meat-induced coma for the rest of my stay. My only beef (no pun intended) was when I tried to order a hamberguesa, wanting to eat something reminiscent of home, only to get a filet cut of steak on funny tasting bread. Still delicious but deceiving. This creation came from Uruguay, topped with ham and a fried egg... Not for the health-conscious.

Submarinos
Observe:
Step 1: Order a Submarino. Receive a mug of freshly steamed milk and a bar of Submarino chocolate.

Step 2: Unwrap the chocolate bar and submerge in the steamed milk like so.

Step 3: Stir the chocolate into the steamed milk for the freshest hot chocolate you've ever had in your life.

Mate

Mate is a type of tea specific to South America, particularly popular in Argentina and Uruguay. Dry leaves of mate are loosely steeped in hot water, and it requires a unique calabash gourd and a bombilla (silver straw) to drink it. The bombilla blocks the loose mate while letting in the delicious, grassy tea. These are some calabash gourds at Recoleta, a popular open-air market for artisans. Almost every person working a stand at Recoleta would be drinking mate, passing the gourd amongst their peers. The ubiquity of mate can be compared to that of Starbucks in the US, except mate is much cheaper.

Wine

It was cheap. It was delicious. It was enjoyed by all.

Wednesday, June 29, 2011

How to Make Lobster Rolls with Five Easy Ingredients


I finally did it! After months of dreaming about cooking up this classic New England creation, I finally made my very own lobster rolls. The sense of accomplishment was overwhelming, but the taste far outshone my pride. This was the last dinner Dylan and I cooked together before heading home for the week to prepare for my Argentine adventures. We made the lobster stuffing the night before, so all we had to do was come home after work the next day, grill up the buns, and overflow them with lobster-y goodness.

Meet Judas.

I was so excited to bring home our new lobster friends, but saddened that we would have to end their short crustaceous lives. I decided we would name them after infamous historical figures to make ourselves (meaning me) feel better about boiling them. Thus, Judas and Brutus came to be. I'd like to think Judas and Brutus had a nice little vacation in our freezer before their time came. I made Dylan cook the poor guys, and he lectured me about how if I'm going to eat meat, I should be able to kill it myself. Somehow I don't see myself hunting wild boar anytime soon.

Here are a few photos of how Judas and Brutus made if from pot to plate.


Yum! After a lot of shell cracking, I started to feel less remorse about Judas and Brutus and more excited for these lobster rolls! Once I had all my meat, I simply mixed in some mayo, lemon juice, scallions and paprika and stuck it in the fridge. Serve with some chips and, if you're looking for a drink pairing, an ice cold Landshark. Bon Appétit!


New England Lobster Rolls
Makes: 4 small rolls  Prep: 40 minutes  Total: 45 minutes

Ingredients
1- 2.5 lb lobster (or 2- 1.25 lb lobsters)
1/4 cup mayonnaise
2 scallions, diced
2 tsp lemon juice
1/2 tsp paprika
Salt and pepper to taste
4 New England-style hot dug buns

Directions
In a large pot, boil lobster for approximately 10 minutes until the shell turns bright red and the lobster floats to the top. (If you're using two lobsters, you most likely will need to cook them one at a time.) Remove lobster and place in a bowl of ice water to cool.
When the lobster is cool to the touch, remove and section off into four pieces: two legs (cut at the elbow joint), the tail, and the body. Begin breaking the legs to remove the meat, including the claws and leg joints. Bend the tail backward to crack the shell, and push the meat up through the end. Don't miss the meat in the fins of the tail!
Once you've extracted all your meat, chop it into small pieces. While the meat is still warm, mix in the mayo, scallions, paprika and lemon juice. Season with salt and peppers and refrigerate for no less than 1 and no more than 24 hours.
Before serving, butter the inside of 4 New England-style hot dog buns and toast until golden brown. Fill with lobster stuffing and serve with a side of chips.
Related Posts Plugin for WordPress, Blogger...