Pages

Saturday, December 25, 2010

Mexican Caviar


It really is true that the best recipes are in the family. My mother acquired this recipe years ago from the Chicago Tribune during our days in Hyde Park. It's a flavorful mix of Mexican corn, olives, black beans, and more perfect for any large gathering. The first time my boyfriend came home with me was for my grandparents' 50th wedding anniversary party, and he couldn't stop raving about this dish. I learned it this summer so I could whip it up for the two of us at school. Since then I've made this recipe so many times that I think I could do it in my sleep. It will always remind me of that first visit and how one recipe can recall so many memories. Here it is, I hope you like it!


Mexican Caviar
Serves: 12  Prep Time: 20 minutes  Total Time: 4-24 hours

Ingredients
2 cans black beans, rinsed and dried
2 cans Mexican style corn, 11 oz
1 can black olives, drained and chopped
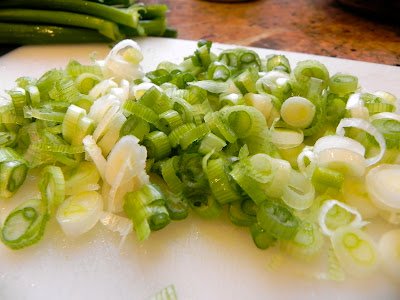
1/2 cup scallions, chopped
1 large tomato, finely chopped
1 avocado, peeled and chopped
1/2 cup vegetable oil
1/4 cup red wine vinegar
1/2 tsp salt
    Directions
    Treat black beans, Mexican style corn, black olives and scallions as directed and combine into a large bowl.
    Mix oil, vinegar and salt in a small bowl and whisk until the oil and vinegar blend together. Pour over bean mixture and toss until coated.
    Store in refrigerator and let marinate for 4-24 hours. Add chopped tomato and avocado before serving.
    Serve with tortilla chips as an appetizer or over rice as an entree.

    Wednesday, December 15, 2010

    Curry Tortellini Soup

    My mom found this great recipe around Thanksgiving, and I enjoyed it so much I wanted to try it myself. I cooked a triple batch of soup for my friends to have after the Boston Tree Lighting. I made it several hours in advance and threw it on the stove right before serving. This recipe is incredibly flavorful and surprisingly easy to make. For a curry dish it's relatively mild so it's great for a large crowd, just enough spice but not too spicy!
    When I made this dish, I replaced the chicken broth with vegetable broth since a lot of my friends are vegetarians, but I've had it both ways and I didn't notice any difference. Also, I chose to use fresh coconut milk from a carton, not the condensed canned kind. I did not garnish it with peanuts but if you're looking for a little crunch it might be a good idea.

    Curry Tortellini Soup
    Serves: 4  Time: 30 minutes

    Ingredients
    1 shallot, finely chopped
    1 fresh jalapeno pepper, seeded and finely chopped
    1 clove garlic, minced
    2 tsp. curry powder
    1 Tbs. cooking oil
    1 14 1/2- oz. can chicken broth
    1 14-oz. can unsweetened coconut milk
    1 9-oz. package cheese tortellini
    1 Tbs. snipped fresh basil
    1 medium tomato, chopped
      Directions
      In a medium saucepan cook shallot, jalapeno pepper, garlic, and curry powder in hot oil about 1 minute or until shallot is tender.  Stir in chicken broth.  Bring to boiling;  reduce heat.  Simmer, uncovered, for 5 minutes.
      Stir in the coconut milk, tortellini, and basil.  Cook and stir about 5 minutes more or until pasta is tender but still firm.  Stir in the tomato.  Cook and stir until heated through, but do not boil.
      If desired, garnish each serving with chopped peanuts.

      Tuesday, December 14, 2010

      Bacon Cashew Caramel Corn

      I'm back and ready to deliver a bunch of new recipes in time for the holidays! I made this delicious bacon cashew caramel corn as an appetizer this Thanksgiving. It was surprisingly easy to make and lasts a long time. You can even make it up to two days in advance and store in the refrigerator. This caramel corn is a perfect festive snack to serve anytime or even wrap up and give as gifts for friends!

      Bacon Cashew Caramel Corn - Adapted from Bon Apetit
      Serves: 12+  Prep: 1 hour 20 minutes  Total: 3 hours
       
      Ingredients
      1/2 cup popcorn kernels
      2 tablespoons vegetable oil
      6 ounces bacon, chopped
      1/2 cup unsalted raw cashews (one 2.5-ounce package)
      1 teaspoon coarse kosher salt or coarse sea salt
      1/4 teaspoon cayenne pepper
      1/4 cup heavy whipping cream
      1 oolong tea bag
      Nonstick vegetable oil spray
      1 1/2 cups sugar
      1/4 cup water
      2 tablespoons light corn syrup
        Directions
        Heat popcorn kernels in a covered pot until popping stops. Immediately remove and place into a large bowl. Cook bacon in a skillet until crispy and drain on paper towels for several minutes. Toss chopped bacon, pecans, salt and cayenne pepper into the popcorn. 
        In a small pot, bring heavy whipping cream and tea bag to a boil. Remove from heat and let steep for 15 minutes. (I used a Chinese black tea instead of oolong and it worked great.) In the meantime, line a baking sheet with foil. Spray baking sheet and two wooden spoons with non-stick spray; set aside.
        Next, heat sugar, water and corn syrup in a saucepan* on medium to low heat until the sugar dissolves. Increase to high heat and let mixture boil without stirring until it turns a deep amber color, swirling occasionally. When this is done, quickly remove from heat and add the cream. Blend and pour over popcorn mixture. Toss with non-stick sprayed spoons until all the popcorn is coated with caramel, then transfer to baking sheet. Bake in 300 degree oven for approximately 20 minutes or until popcorn is evenly coated and caramel is shiny. Remove and cool, breaking up any large clumps with a wooden spoon. Enjoy!

        *Be sure to soak the caramel saucepan and spoons immediately after using. The caramel solidifies quickly and can be difficult to get off.

        Tuesday, November 9, 2010

        Apple Crumble Muffins


        I love to bake, anything from bread to cake to pie. Even if my pantry is empty, there's still always a good supply of flour, sugar, baking powder, salt and other baking essentials. Here's a recipe I found online for apple muffins with a cinnamon crumble on top. (You can see one's already missing a bite on the right side.) I made these in my boyfriend's apartment and between us and his roommates, they were gone by the end of the day. The only problem I had with these muffins was that they were really crumbly and barely stayed together. The cinnamon crumble on top was delicious though. I think next time I'd try this recipe in bread form and hope it would hold together a little better.

        Apple Crumble Muffins - Adapted from College Candy
        Makes: 24 muffins  Prep: 10 minutes  Total: 40 minutes

        Ingredients
        1/2 cup butter 
        1 1/4 cups white sugar
        1 teaspoon vanilla extract
        1/2 teaspoon salt
        2 eggs
        1 3/4 cups all-purpose flour
        2 teaspoons baking powder
        1/2 teaspoon ground cinnamon
        1/2 cup milk
        2 cups peeled, cored and sliced apples
          Directions
          Beat butter, sugar and vanilla until smooth. Add eggs.
          Mix in flour, baking powder and cinnamon, then pour in milk. Fold in apples and pour mixture into muffin tins.
          Sprinkle cinnamon crumble on top and bake at 375 for 30 minutes.

          Cinnamon Crumble 

          Ingredients
          1/2 cup white sugar
          1/2 teaspoon ground cinnamon
          3 tablespoons all-purpose flour
          2 tablespoons butter, cubed
            Directions
            Combine ingredients in a bowl and mix, cutting the butter with two butter knives to the size of small peas and coating with dry mixture.

            Tuesday, November 2, 2010

            Recipes Online

            In the age of a generation raised online, information can be accessed instantly by the click of a button. Today hundreds of thousands of recipes are available on the internet, providing never-ending opportunities to expand your food tastes and discover new recipes. Some of these websites and blogs cater to experienced chefs, while others are targeted at people with limited cooking ability. Though I have a plethora of recipes I've inherited from family members, I often find meals on these food sites when I'm looking for a quick fix. Here are a few useful websites I wanted to share as well as recipes I've found on each.

            allrecipes.com
            This site is great for finding tons of variations on a simple recipe.

            These are stuffed peppers I made last week. The baked green peppers are stuffed with ground beef, rice, onion, cheddar cheese and topped with condensed tomato soup before baking for 30 minutes. I was skeptical about the soup at first, but it did a great job of keeping the beef and rice from drying out in the oven. These reheat well too, so don't hesitate to make extra.
            Click Here to try it!

            supercook.com
            By entering ingredients that are in your pantry into the Supercook search engine, this website pulls up hundreds of recipes you can make using the food you already have. (Note: This is a database that will lead you to other food sites to view the actual recipes, so go to the supercook.com for the original website.)

            Here's an easy cheeseburger pie I whipped up for dinner last night. I needed a way to get rid of the pound of ground beef in my freezer using what I had. All this recipe requires is ground beef, Bisquick, an onion, 2 eggs, milk, salt and cheddar cheese. Bakes for 25 minutes and leaves plenty of leftovers for lunch on the go.
            Click Here to try it!


            tastespotting.com
            If you're an adventurous eater, then you'll love TasteSpotting. This is a site I discovered today and am really excited to try. Recipes ranging from Korean Pumpkin Porridge to Banana Avocado Pancakes are sprinkled across the site's homepage, with pictures that'll instantly make your mouth water. It premieres a culturally diverse representation of regional cuisines, and you know it's authentic because some of the recipes are still written in their native language! (I found a French onion soup recipe that's written in Polish. Pretty cool, right?)

            These pork chop sandwiches are called cemitas, originating from Puebla, Mexico. Cemitas are slider-sized sandwiches, this particular one layered with pork, avocado, sweet cherry peppers and mozzarella all on a homemade roll that takes 8 hours to rise. Whoa. This might be my next culinary feat to tackle.
            Click Here to try it!

            Monday, November 1, 2010

            Pasta Sauce Alternative

            Being a college student, I'm naturally broke. Thus, my pantry is usually stocked with $1 boxes of pasta and not much else. This is great except for the fact that I never invest in pasta sauce to go along with it. So here's a trick I always use. Instead of buying sauce, grill up vegetables in a pan with some olive oil and use them to top your pasta.

            This is also a great way to get rid of produce before it goes bad. I love cherry tomatoes but can never finish a whole package, so the other day I chopped them up along with some leftover sage, grilled them for about 10 minutes, and seasoned with salt and pepper. In the time it took me to boil water and cook my pasta I had a big healthy meal prepared, and I didn't even have to go to the store!

            Monday, October 25, 2010

            Thursday Fiests: October

            This year, my girlfriends and I started the tradition of Thursday night dinners. Sometimes we stay in and make food, and sometimes we go out in search of new restaurants in the city. This past Thursday, I wanted to try a recipe I found in October's Bon Appetit magazine. It looked a lot harder than anything I'd made before, but I really wanted to tackle it. Four hours and several sliced fingers later... ta-da!
            Click Here to try it!

            Ok, so this is clearly not my picture but I couldn't get a great one while cooking and I was having too good of a time with my friends to worry about capturing it. Even though I spent hours in the kitchen that I should have spent writing a paper, it was well worth it. My friends raved about this dish the entire evening, and not gonna lie I did a pretty damn good job. I think I'll appreciate homemade pasta way more now after making it myself. The only bad thing about this recipe when it comes to college cooking is it called for a potato ricer. (I still don't really know what that is.) But with a little Google searching I decided that it looked like a garlic press for turning potato into pasta, so I ended up chopping the potato into little cubes and pushing it through our garlic press. Time consuming but it got the job done. Another key to this recipe is in the Parmesan. I made sure to get the freshest grated Parm possible, and it definitely made a difference. So, if you have a day with not much to do and are feeling ambitious, I certainly recommend you try this out! The final product is rewarding and absolutely worth the effort.

            Oh, and to top it all off, why not a four layer pumpkin cake with cream cheese frosting?
            We might need to institute Friday night gym dates next...

            Tuesday, October 19, 2010

            Perfectly Seasonal Apple Cider Syrup


            Another simple recipe I'd like to share, and a favorite from my childhood - my mother's apple cider syrup. I can't get enough apple cider come fall. This syrup is easy to make and, in my opinion, far better than maple syrup which, as a native New Yorker accustomed to fresh-off-the-tap maple syrup, says a lot. This apple cider syrup is super easy and tastes great with apple pancakes (seen above). It makes three cups so with one batch of pancakes there should be half left over. I'm thinking it would also be great on some sort of apple dessert with vanilla ice cream... mmmmm my sweet tooth is swelling just thinking about it. Look for that recipe to come.

            Apple Cider Syrup
            Makes: 3 cups  Prep: 10 minutes  Total: 15 minutes 

            Ingredients
            1 cup sugar
            3 tablespoons baking mix (Bisquick)
            1 teaspoon ground cinnamon
            2 cups fresh apple cider
            2 tablespoons lemon juice
            1/4 cup butter
              Directions
              Mix dry ingredients in pot, then add cider and lemon. Cook, stirring constantly, until mixture thickens and boils. Boil and stir for one minute, then immediately remove from heat and add butter.

              Grilled Eggplant Bagel Sandwich

              If you like eggplant, you'll love this easy recipe. I, for one, love eggplant, but have a hard time putting it to use. In my opinion it's one of the most underrated vegetables (well, fruit if you wanna get technical). It is the steak of produce; tough, meaty and full of flavor. So after purchasing an eggplant with no idea as to what I would do with it, I got a little creative. I present to you... the Grilled Eggplant Bagel Sandwich.


              Takes about 15 minutes to prepare. Begin by lightly coating a medium saucepan with olive oil (this is important or else the eggplant will get too greasy, an olive oil mister works best) and lay down three 1-inch slices of eggplant on the pan. Cook at medium heat until golden and firm. In the meantime, slice several pieces of fresh mozzarella cheese and one large roasted red pepper (cut one side and lay flat). Place the mozzarella on top of the eggplant and cook until slightly melted. Next, remove from heat and assemble on a toasted bagel.* First lay down the eggplant, then drape the red pepper on top. Now throw it on a George Forman and get it extra toasty. Remove at desired toastiness and serve with Stacey's Pita Chips and a cup of butternut squash soup.

              *(What made this sandwich so great was a multigrain New Jersey bagel my roommates brought back with them after their trip home. NY/NJ bagels are known for their fluffiness. However, if you don't have time for a trip to the Dirty Jerz, any bagel will do.)

              Monday, October 18, 2010

              Food Beginnings

              In the time that it's taken me to create this blog, my roommate and her boyfriend have stormed into the kitchen in our modest university apartment and scoured the fridge for desirable lunch options. After rummaging through the pantries for fifteen minutes, the disgruntled boyfriend finally settled on an unappetizing selection of frozen mystery meat from our campus on-the-go food service, and unbeknownst to him, provided me with the perfect impetus for my first post.

              Food has always been a central aspect of my well-being. Growing up, family gatherings included excessive homemade feasts, resulting in the ordinary heap of leftovers. I sat down with my parents and siblings every night to a well-prepared meal as we cycled through the events of our day. Once I moved away to college, I quickly learned that this is not the norm in most American households these days. In our fast-paced society, people don't have time to prepare good quality food or even enjoy what they eat anymore. My goal is to prove that it's possible to create delectable meals, even while balancing classes, exams, a job, clubs and a typical college social life. Whether you're throwing a dinner party for your friends, baking a cake for a loved one's birthday, or just trying to make breakfast without breaking the bank, good eating is easy.

              My plan is to post several times a week about recipes I've found or created, and recommend new food to try. I'm not a chef, and I'm not in culinary school. I'm just your average college undergrad who loves to cook and share food with her friends. I do, however, have a dream of one day creating my own catering company, so if you have any feedback as to what looks good or what to improve on, feel free to share. (I'll try to post pictures of the food I share to make this blog more aesthetically enticing, but since all I have currently is a camera phone stick with me until I invest in a higher quality camera.)

              On that note, I've got midterms to study for. Stay tuned for my first featured recipe!
              Related Posts Plugin for WordPress, Blogger...