Pages

Tuesday, December 18, 2012

Traditional New Orleans Gumbo


My winter break has officially started, which means plenty of relaxing, gift shopping and of course, cooking! My parent's kitchen pantry is a godsend for college students like myself. No need to run to Whole Foods and spend $10 on that obscure seasoning, or cross my fingers that there's still enough flour to make a batch of birthday cupcakes. My mom is an excellent cook and uses our kitchen often, so rest assured it is well-stocked when I return home. I just finished my last semester of classes until September and will be returning to work at Johnson & Johnson for my third internship (called co-op) this January. I had an amazing experience last round and am looking forward to my new office, position and coworkers. It's strange how much I prefer working full-time to classes... I will probably kick myself for this later when I don't have a choice.


On my drive home from school, I listened to an APM podcast, The Splendid Table. You can download them for free on iTunes, and I would say it's a must for any foodie. I got really into podcasts on my last co-op when my coworker and roommate introduced me to Radiolab, and ever since I search the web for interesting listens to accompany me on long drives. I'll be living in Boston next semester to stay close to friends, but in return I'm facing over an hour commute every day. (Yikes.) I plan to become an expert in podcasts by the end of my six months at J&J, and will definitely revisit Splendid Table. The episode I discovered on my drive was all about New Orleans cuisine, hence the desire to create my own version of traditional Creole-style gumbo!
 

I did a lot of research for this recipe. I wanted to create a truly authentic rendition of New Orleans gumbo, and learned a thing or two about southern cooking in the process. Every traditional gumbo recipe begins with roux, a French concoction and thickening agent made of flour and fat or oil. I chose to use vegetable oil because it is used in most New Orleans restaurants and is more difficult to burn than butter. The roux can be cooked shorter or longer to achieve a "city" taste, popular in New Orleans, or a Creole-inspired country flavor. I chose an in between consistency which created a smoky but not overpowering taste. I also mixed a typical chicken and sausage gumbo with seafood by adding a little shrimp, because given the option, one should always add shrimp. Naturally.


And finally, the pièce de résistance, filé powder! I had never heard of it, but it's simply dried ground sassafras that is traditionally sprinkled over gumbo before eating. It was difficult to find at the major grocery store near me, but this one-time buy will last for years of homemade gumbo creations. Another note: many recipes I saw required cayenne pepper or pepper sauce, but simmering the andouille sausage in the broth gave my gumbo almost too much spice, and this is coming from a girl who loves spicy things. If you plan to recreate this recipe feel free to give it an extra kick, but you've been warned...

Traditional New Orleans Gumbo
Serves: 6  Prep: 1 hour, 30 minutes  Total: 3 hours

Ingredients
1 cup flour
1/2 cup vegetable oil
1 yellow onion, diced
5 garlic cloves, diced
2 celery stalks, diced
1 green pepper, diced
1 cup okra, sliced
14 oz canned diced tomatoes
3 1/2 cups chicken broth
1 lb boneless, skinless chicken thighs
1 lb andouille sausage
3/4 lb shrimp, peeled and deveined, cooked or uncooked
2 tbs parsley
2 tbs tyhme
2 tbs Worcestershire sauce
1 tbs paprika
2 bay leaves
Salt and pepper to taste
Filé powder to taste
3 cups white rice

Directions
Prior to making the roux, dice the onion, garlic, celery and green pepper and slice the okra. Set aside.
Making the roux: Combine the vegetable oil and flour in a large pot and mix well. Cook on low to medium-low heat for 30 minutes, stirring every minute or so until the color resembles melted milk chocolate and develops a nutty smell. (Roux can be cooked for less or more time to achieve desired flavor.)
Add the chopped vegetables to the roux, cover and cook on medium-low heat for 30 minutes, stirring occasionally.
While the vegetables are cooking, lightly salt and pepper the chicken thighs and bake at 375 degrees for 20-25 minutes or until cooked through. If shrimp are uncooked, lightly oil a frying pan and cook on medium heat for 4 minutes on each side until pink and cooked through. Chop the andouille sausage, cooked shrimp and cooked chicken into large chunks.
When vegetables are softened, add the diced tomatoes and chicken broth and let simmer uncovered on medium heat for 5 minutes. Add the remaining ingredients and simmer uncovered for 30 minutes to an hour, stirring occasionally.
Cook rice as directed and serve a heaping pile of gumbo on top of one serving of rice. Sprinkle with filé seasoning and enjoy!

Friday, November 23, 2012

Pumpkin Cupcakes with Cream Cheese Frosting


In the post-Thanksgiving haze, what a better way to gear up for the holiday season than by continuing to stuff ourselves? The fall season is on its way out, so I'm sneaking in one last autumn dish before transitioning to Christmas mode. All my girlfriends from high school went out to celebrate our best friend Kara's birthday this Wednesday, so I made these cupcakes as a birthday gift (not that we needed more food). The only thing better than great cupcakes is sharing them with great people. And I'm thankful to have so many great people to come home to each holiday season. :)


I found this cupcake recipe on Martha Stewart which has never failed me, especially when it comes to baking. These were super moist and perfectly spiced - I think I found a new go-to recipe for the fall! Autumn cooking has always been my favorite, so don't be surprised if you see a few fall-inspired dishes in the off season. (E.g. these pumpkin blueberry scones I squeaked in early fall of last year.) However, I am looking forward to making some great comfort foods this winter. Happy start to the holiday season, everyone!


Pumpkin Cupcakes with Cream Cheese Frosting (adapted from Martha Stewart)
Makes: 18 cupcakes  Prep: 20 minutes  Total: 45 minutes

Ingredients
2 cups flour
1 tsp baking soda
1 tsp baking powder
1 tsp salt
1 tsp cinnamon
1 tsp ginger
1/4 tsp nutmeg
1/4 tsp allspice
1 cup light brown sugar
1 cup white sugar
1 cup butter, melted and cooled
4 eggs
1 15-ounce can organic pumpkin
2 8-ounce packages cream cheese
1/2 cup butter
2 cups powdered sugar
1 1/2 tsp vanilla
2 tsp pumpkin pie spice
Extra cinnamon for garnish

Directions
Preheat oven to 350 degrees.
Combine flour, baking soda, baking powder, salt, cinnamon, ginger, nutmeg and allspice in a large bowl. In a separate bowl mix sugars, butter and eggs until smooth. Pour the dry ingredients into the sugar mixture, then add pumpkin. Pour into cupcake tins and bake for 20 to 25 minutes or an inserted toothpick comes out clean.
In the meantime, make the frosting by beating cream cheese and butter in an electric mixer on high. Turn off the mixer, add powdered sugar, vanilla and pumpkin pie spice, then beat on medium speed. Put in a piping bag and ice cupcakes when cooled. Garnish with additional cinnamon.

Thursday, November 8, 2012

Easy and Decadent Homemade Tomato Soup


I have had a lot of recipes flop recently, which has attributed to a month of no blog posts. There's nothing more disappointing than investing several hours of development and execution on a recipe that doesn't quite make the cut. Specifically, 4 1/2 hours (of cooking alone) on a butternut squash lasagna that was "good" but way below my expectations. Siiiigh. On the bright side, this recipe is definitely worth the share. Last month's Bon Appetit featured an amazing spread on this dinner party idea - homemade tomato soup and grilled cheese! They took something so basic and made it upscale and delicious. And who doesn't love this combination?


It's perfect soup weather here in Boston (cue sniffles) so I made a huge batch of soup and had some girlfriends over. Like the article recommended I gathered several different types of cheese, then fried slices of bread on each side and let my friends arrange their own toppings before popping them in the oven. This was much faster than frying each sandwich and allowed for some creativity. If you want to get really fancy throw some meat, veggies or fruits into the mix and discover other unique grilled cheese combos. For tons of awesome, cheesy ideas (or if you simply want to drool some more) check out one of my favorite food porn blogs: Grilled Cheese Social!


Creamy Tomato Soup (from Bon Appetit)
Serves: 8  Prep: 30 minutes  Total: 1 hour, 30 mintues

Ingredients
1/4 cup butter
10 thyme sprigs
1 yellow onion, diced
2 cloves garlic, diced
1/4 cup tomato paste
2 28-ounce cans whole tomatoes
2 tsp sugar, divided
1/2 cup heavy cream*
Salt and pepper to taste

Directions
Melt butter in a large pot and add thyme, onion and garlic. Cook for 10 minutes on medium heat or until onion is cooked through. Add tomato paste and cook for another 5 minutes. Next, add whole tomatoes with juice, 1 tsp sugar and 8 cups water to the pot and turn heat on high. When the pot reaches a simmer, lower to medium heat and cook for 50-60 minutes or until about one cup or liquid evaporates.
Remove from heat and get rid of thyme sprigs. Puree soup in a food processor in parts and return to pot. Stir in heavy cream and season with salt, pepper and remaining 1 tsp sugar. Simmer for another 15 minutes before serving.

*The original recipe calls for only 1/4 cup heavy cream, but I strongly recommend 1/2 cup to achieve a thicker consistency and richer flavor.

Thursday, October 11, 2012

Mom's Apple Pie


It's officially fall here in Boston. Over the weekend temperatures dropped from high 70's into the low 50's. Thankfully I was able to enjoy the warmth while it lasted over the holiday weekend. On Friday, Dylan and I went apple picking at an orchard one hour outside the city. The leaves were beautiful driving through the countryside and it made me feel a little closer to home. When we arrived the orchard workers directed us to a line of disappointing green apples, but we found a secret field wayyy in the back and picked ourselves a bag of pretty, miscellaneous red apples! It involved some piggy-backing and tree climbing, but all the effort made it more rewarding.


And on Columbus Day, we took a day trip to Mount Monadnock in New Hampshire and went on a fantastic 4-mile hike. Ever since my trip to Alaska I have been itching for the outdoors, and it was a great day to escape the city. Not to mention my awesome treat at the top of the summit! PB&J has never tasted so good.


Of course, what else does one do with a bag of freshly picked apples besides bake them in something delicious? I decided to finally tackle my mom's famous apple pie. Every year for Thanksgiving she makes two apple pies and the morning after, we all wake up and have a slice of pie for breakfast. One year she tried a different recipe from Ina Garten and the whole family complained it didn't compare. Now this pie is on the list of family traditions that we don't mess with. For another great family recipe, take a look at my Grandma's Apple Cake.


Mom's Apple Pie
Makes: 1 pie  Prep: 30 minutes  Total: 1 hour, 20 minutes

Ingredients
2 cups flour
1 tsp salt
2/3 cup and 2 tbs Crisco (preferably the yellow, butter-flavored variety)
1/4 cup water
6-7 cups sliced apples
1 cup sugar
3 tbs cinnamon
2 tbs butter

Directions
Mix flour and salt. Cut in shortening with two knives until fine particles. Add water and mix well, but don't overwork it or else the dough will be tough. Form into a ball, cut in half and roll out each crust.
In a large bowl, toss sliced apples with sugar and cinnamon. Lay down the bottom crust in a greased pie tin and cover with sugared apples. Cut butter into 1/4" cubes and sprinkle on top of apples. Cover with top pie crust and pinch edges together. Cut four large slits in the top of the pie and bake at 450 for 50 minutes. Remove, sprinkle with sugar and let cool.

Tuesday, September 25, 2012

Spiced Apple Cupcakes with Salted Caramel Frosting


Not to wish summer away, but I love that fall is in the air here in Boston! Autumn is absolutely my favorite season and it makes me miss my home in Upstate NY terribly. I am currently alternating between three fall scented Yankee candles and digging out my fall decorations. (See my new Current Obsessions for more fall things.) So since two of my best friends' birthday were this month, I made them both a batch of these autumn-inspired cupcakes.


As you can see, I had trouble resisting them during the photo shoot. I knew I wanted something apple-y, but I was afraid apple cupcakes would fall too quickly into the muffin category. That's why this recipe is so great - it has texture and consistency of cake, but with all the warm flavors of fall. The caramel frosting is delicious and fun to make, but don't add the cream too soon (like I did the first time) or you'll end up with a hard piece of caramel candy... Whoops. For cupcakes this recipe is a little time-consuming, but well worth the effort. Enjoy!


Spiced Apple Cupcakes with Salted Caramel Frosting (Adapted from Chow)
Makes: 24 cupcakes  Prep: 25 minutes  Total: 1 hour, 20 minutes

Ingredients
Cupcakes:
3 Gala apples, grated
2 1/2 cups flour
2 tsp baking powder
1 tsp salt
1/2 tsp cinnamon
1/2 tsp ginger
1/2 cup butter
1 cup sugar
1 cup brown sugar
1 tsp vanilla
2 eggs
3/4 cup low fat buttermilk

Frosting:
1/4 cup sugar
2 tbs water
1/4 cup heavy cream
1 tsp vanilla
3/4 cup butter
1 tsp sea salt
1 cup powdered sugar

Directions
Cupcakes:
Peel, slice and grate apples with a food processor or by hand. Place grated apples in a colander, sprinkle with salt and let sit while you prepare the rest of the batter. (This will help dry out unwanted moisture.)
In a medium bowl, mix flour, baking powder, salt, cinnamon and ginger. In a separate bowl, cream the butter and add sugar, brown sugar, vanilla, eggs and buttermilk. When the wet ingredients are fully incorporated, add dry ingredients into the mixture and combine until smooth. Lastly, squeeze out the grated apples to rid of excess moisture and add to the batter.
Pour into greased or papered cupcake tins and bake for 25-30 minutes or until an inserted toothpick comes out clean. Let cool completely before icing and store in an airtight container in the refrigerator.

Frosting:
Combine 1/4 cup with water in a small pot and bring to a boil. Cook at medium-high heat for about 5-8 minutes until the mixture turns and dark caramel color. Remove from heat and let cool for 5 minutes, then slowly mix in the heavy cream in small increments. Add the vanilla, mix well and let sit until the mixture is cool to the touch.
In a separate bowl, cream the butter with the sea salt and then add powdered sugar. Add the caramel and mix well. Store in the fridge for 30 minutes before icing.

Alaskan Smoked Salmon Dip


This recipe is a bit delayed, but better late than never! At the end of the summer my family and I traveled north to Alaska and it was by far the coolest vacation we've ever taken. My uncle Bill has been in Anchorage for the past few years, so we stayed with him and traveled to a few other cities. Here are some highlights from the trip:

K2 Aviation Flight with glacier landing
Bear spotting at Denali National Park
Glacier hiking at Matanuska
Glacier boat cruise in Seward
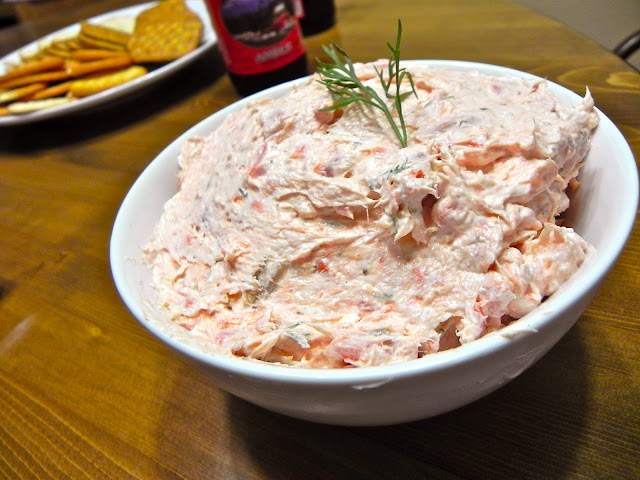
On top of all the fun sightseeing, we ate some really good food and drank some great locally-brewed beer. On one of our last nights in town, we made a feast with Bill's freshly caught caribou from his hunting trip the weekend before. He seasoned each slice with salt and pepper, wrapped them in bacon and grilled them until tender. I added this smoked salmon dip to the meal with Alaskan salmon Bill had caught himself and brought to a smokehouse. I don't think I can ever eat store-bought smoked salmon again. It was unreal how amazing the fresh salmon was, and combined with the caribou it made for a perfect Alaskan meal!


Alaskan Smoked Salmon Dip (Adapted from Ina Garten)
Yields: 6-8 servings  Prep: 20 minutes  Total: 20 minutes

Ingredients
8 ounces cream cheese
1/2 cup sour cream
2 tbs lemon juice
1 1/2 tbs horseradish
1 1/2 tbs fresh dill
1 tsp salt
1/2 tsp pepper
1 lb Alaskan smoked salmon, shredded

Directions
Combine softened cream cheese, sour cream, lemon juice and horseradish in a medium bowl. Mix in dill, salt and pepper. Shred the smoked salmon using two forks and remove any small bones. Mix the salmon into the dip. Serve immediately with crackers or refrigerate.

Thursday, August 30, 2012

Oreo-Stuffed Chocolate Cupcakes


This post only gets live-action shots because the cupcakes were devoured too quickly. I've made these once before and they were a hit both times. This time I brought them to a reunion weekend with my best girlfriends from high school to my friend Kayleigh's beauuuutiful camp in Canada. After a rough summer of working and taking classes, this weekend was AMAZING and I cherished every moment of it.


It was my friend Ali's birthday, so I brought 24 of these cupcakes with me. I know everyone likes cupcakes, but Ali really reallyyy likes cupcakes. Have you ever seen someone cry over wanting a cupcake so bad? Apparently that can happen, and has happened to Ali. Maybe even more than once. Anyway, we could never have a birthday celebration for her without cupcakes, and with the gourmet chocolate cake Ali brought from home, we were all well-fed throughout the weekend.


For me, my favorite parts about food blogging and cooking in general are the stories behind each recipe and who you share it with. Being able to escape the city for a weekend and spend time with my best friends was the real treat, these cupcakes were just dessert. :)


Oreo-Stuffed Chocolate Cupcakes (Cake Recipe from Hershey's)
Makes: 24 cupcakes  Prep: 15 minutes  Total: 40 minutes

Ingredients
2 cups sugar
1 3/4 cups flour
3/4 cup cocoa
1 1/2 tsp baking powder
1 1/2 tsp baking soda
1 tsp salt
2 eggs
1 cup milk
1/2 cup vegetable oil
2 tsp vanilla
1 cup boiling water
24 Oreos, plus more for garnish
1/2 cup butter
1 tsp vanilla
2 1/2 cups powdered sugar
3/4 cup chocolate chips

Directions
Combine sugar, flour, cocoa, baking powder, baking soda and salt in a large mixing bowl. Whisk in eggs, then add milk, oil and vanilla and mix well. Add 1 cup boiling water (batter will be very thin) and pour into cupcake tins. Drop a whole Oreo cookie into each cupcake tin and top with excess batter or push down to cover. Bake for 25-30 minutes or until an inserted toothpick comes out dry.
To make frosting, beat together softened butter and vanilla until creamy. Mix in powdered sugar in 3 parts. Microwave chocolate chips in 30-second increments and stir until melted and add to frosting. Mix well and pipe onto cooled cupcakes.

Asparagus and Crab Risotto with Orange Gremolada


Time for a little catch-up blogging. My summer ended a little crazy but I have a few new recipes to share! Even though I love the freshness of summer produce, I'm already looking forward to the comfort food of fall. That being said, here's a great spring/summer recipe I found in one of my grandmother's vintage cookbooks she sent to Boston with me after my last trip home. The book is called One-Dish Meals from Food & Wine magazine, and though some of the dishes are pretty hysterically outdated (casseroles, anyone??) I found a lot of great ones I can't wait to try.

I made homemade chicken stock for the first time, which I would not advise someone to do in a tiny kitchen in the middle of August with no air conditioning... I did it anyway, and it was worth it. I took a carcass leftover from a rotisserie chicken and simmered it in a large pot with water, chopped vegetables (carrots, onion, parsley, celery) and some salt and pepper for 4 1/2 hours. After draining, I stored it in a large container in the fridge and used it within 3 days. Super easy and it made the risotto that much better!


Asparagus and Crab Risotto with Orange Gremolada (Adapted from Food & Wine)
Makes: 5 servings  Prep: 15 minutes  Total: 1 hour

Ingredients
4 cups homemade chicken stock
1 1/2 cups water
1 lb asparagus, cut into 1/2 inch pieces
2 tbs butter
1 tbs olive oil
1 yellow onion, diced
1 1/2 cups brown rice
1/2 cup dry white wine
1 tsp salt
1/2 tsp pepper
1/2 lb crab meat
1 tsp grated orange zest
2 garlic cloves, minced
1/4 cup parsley, chopped

Directions
In a medium pot, simmer broth and water together and cook chopped asparagus until tender, about 5 minutes. Remove, drain and set aside.
In a large pot, cook diced onion in 1 tbs butter and 1 tbs oil until slightly translucent. Add rice and cook for another 2 minutes. Add the vermouth, salt and pepper. Next, add the broth one 1/2 cup at a time, letting the rice absorb the liquid before adding more. Continue this until all the broth is used and absorbed or until desired thickness is reached.
Lastly, mix in the crab meat, asparagus, orange zest, minced garlic, parsley and remained 1/2 tbs butter. Heat through and serve immediately or store in an airtight container for up to 48 hours.

Wednesday, August 8, 2012

Gingered Zucchini Orange Bread


I know summer is supposed to be all about fresh produce and farmers markets, but recently all I've wanted to do is bake. So - sneaky me - I found a way to incorporate seasonally appropriate ingredients with my craving for baked goods. The result is a new citrus-y spin on zucchini bread. If you've ever been turned off by the idea of veggies in your baked goods, this bread will bring you around. The glaze on top makes it especially decadent, so add it generously. (I may have dipped a piece of bread in the leftover glaze... perhaps that's a bit too generous.)


Bread is one of my favorite things to make. There is something very maternal about the process, particularly when it involves kneading with your hands and waiting for the yeast to rise. However, bread is very time consuming, so pour-and-bake loaves like these give you all the pleasures of baking bread without the hours spent. (No knead, har-har.) This batch makes two loaves, so make one for yourself to enjoy and share one with friends! Or not. Your call.


Gingered Zucchini Orange Bread
Makes: 2 loaves  Prep: 20 minutes  Total: 1 hour, 5 minutes

Ingredients
3 cups flour
2 tsp baking soda
1/2 tsp baking powder
1/2 tsp salt
1/2 tsp ginger
1 cup white sugar
1/2 cup brown sugar
3/4 cup olive oil
3 eggs
2 tsp vanilla
2 1/2 cups zucchini
1 cup chopped walnuts
2 tbs orange zest
1 1/4 cup powdered sugar
1 tsp lemon juice
3 tsp orange juice

Directions
Combine flour, baking soda, baking powder, salt and ginger in a large bowl. In a separate bowl, mix together sugars, olive oil, eggs and vanilla.
Using a food processor, shred the zucchini on a grater setting and add to the wet ingredients. Pour the wet ingredients into the dry ingredients in two parts, mixing thoroughly. Add chopped walnuts and orange zest. Pour into two greased loaf pans and bake for 45 minutes or until an inserted toothpick comes out dry.
Combine powdered sugar and citrus juices in a bowl to make the glaze. When the loaves are done, let them sit for 5 minutes. Remove from the pans and set onto wax paper. When loaves are cool to the touch, brush on glaze with a basting brush, letting a little drip down the side. Serve immediately or store in an airtight container.

Tuesday, July 31, 2012

Baja Blackened Haddock Fish Tacos


Happy summer everyone! Since moving back to Boston, I have been crazy busy with classes and picking up my first restaurant job in the city. I'm surrounded by awesome food all the time, but haven't gotten to make my own too much. Last week was Dylan's birthday, so it was my first chance to make something really special. Since his favorite type of food is "Pacific Mexican" (is this even a real type of food?) I spent five hours whipping up a 3-course meal with these fish tacos as the main event. I've never really eaten fish tacos, so I left the official taste test up to Dylan.


So yeah... They were prettyyyy good. In addition to the tacos, I made homemade tortilla chips, my salsa verde from last spring, some beer-battered coconut shrimp with a Mexican cabbage salad, and fried plantains with vanilla ice cream for dessert. We had to take a walk around the park after dinner to make some room for dessert, but it was worth it and made for a perfect night. :)


Baja Blackened Haddock Fish Tacos
Serves: 6 small tacos  Prep: 30 minutes  Total: 40 minutes

Ingredients
6 corn tortillas
1 lb haddock fillets
1 tbs Old Bay spice
1 1/2 tsp garlic salt
1 1/2 tsp paprika
2 tsp pepper
1 cup shredded cabbage
3 pickled jalapenos, sliced
1/3 cup tomato, diced
1/3 cup onion, diced
1/2 avocado, sliced
1/4 cup black beans
3 tbs Crema Mexicana (sub sour cream or mayo)
3 tbs lime juice
1 1/2 tsp paprika
2 tsp jalapeno, finely diced

Directions
Combine Old Bay, garlic salt, paprika and pepper in a small bowl. Lay haddock in a shallow dish and press seasoning onto fillets. Cover efrigerate for 1 hour.
In the meantime, prepare cabbage, pickled jalapenos, tomato, onion and avocado as directed. Bake the black beans on the stove and set aside. To make the white sauce, whisk together Crema Mexicana, lime juice, paprika and finely diced jalapeno.
Fry the seasoned haddock fillets in sunflower seed oil or olive oil, flipping every few minutes until they are completely cook. Lay down corn tortillas and assemble fish, vegetables and white sauce.

Friday, July 13, 2012

Milk Chocolate Raspberry Cupcakes


I'm pretty sure I could spend the rest of my life making cupcakes and I would be perfectly happy. Perhaps it's my love of miniature things, I don't know. But THESE cupcakes were an exciting discovery. I didn't know exactly what I was making until they were done and sitting in my fridge. What started in my head as a two-layer chocolate cake turned into uber-moist cupcakes that taste exactly like chocolate covered raspberries... but cake. I guess I'm at my best when I have no clue what I'm doing.


I made a full batch for a very special occasion - my friend Garam's birthday! A group of us devoured them pretty fast and when I told an acquaintance that I have a food blog, he asked me where he could order these cupcakes. New business plan? I think so. Don't worry friends, you'll still get free food... for now. ;)


Milk Chocolate Raspberry Cupcakes (adapted from Hershey's)
Makes: 24 cupcakes  Prep: 35 minutes  Total: 2 hours

Ingredients
2 cups sugar
1 3/4 cups flour
3/4 cup cocoa
1 1/2 tsp baking powder
1 1/2 tsp baking soda
1 tsp salt
2 eggs
1 cup milk
1/2 cup vegetable oil
2 tsp vanilla
1 cup boiling water
2 cups fresh raspberries
3/4 cup water
1 cup sugar
1 tsp vanilla
2 cups powdered sugar
1 cup butter, room temperature
6 oz milk chocolate
1/3 cup raspberry juice (from filling)

Directions
Combine sugar, flour, cocoa, baking powder, baking soda and salt in a large mixing bowl. Whisk in eggs, then add milk, oil and vanilla and mix well. Add 1 cup boiling water (batter will be very thin) and pour into cupcake tins. Bake for 25-30 minutes or until an inserted toothpick comes out dry.
In a small pan, heat water, sugar and fresh raspberries on medium-high heat, stirring occasionally until most of the water is cooked down. Pour out 1/3 cup of liquid from boiled raspberries and reserve for frosting. When raspberry filling is relatively thick, remove from heat and refrigerate for 1 hour.
To make the frosting, combine powdered sugar and butter in a large bowl and beat until fully incorporated. Microwave milk chocolate and stir until fully melted, then add butter and sugar with raspberry juice.
When cupcakes are cool, scoop out a spoonful from the center of each and pour in raspberry filling. (You may top with the scooped-out cake if desired.) Pipe on frosting and top with raspberries to serve.

Thursday, June 14, 2012

Buffalo Chicken Mac N' Cheese Bites


This is a perfect example of why America has an obesity problem. We reinvent dishes like macaroni and cheese to make them more tantalizing, irresistible and heart-stopping over and over. Fried oreos, bacon sundaes, chocolate covered corndogs, and now - buffalo chicken mac n' cheese. This is terrible. This is wonderful.


We had a Finger Food Challenge in my office last week, so I wanted to make something cheesy but easily portable. I ran out to buy a mini cupcake tin, which I now need to find a hundred other recipes for because they make everything bite-sized and adorable! My love of sliders and miniature food items made these mac n' cheese bites a no-brainer. My coworkers made two different buffalo chicken dips (3 TIMES the buffalo chicken!!!), bruschetta on toast, and two potato samplers with smoked salmon and dill sauce.

The food
Contestants with their prizes
Needless to say, we were all winners.


Buffalo Chicken Mac N Cheese Bites
Makes: 36 bites  Prep: 20 minutes  Total: 30 minutes

Ingredients
1/2 lb elbow macaroni
3 tbs butter
2 tbs flour
1 1/2 cups shredded mozzarella
1/2 cup crumbly blue
1 tsp salt
1 tsp pepper3/4 cup milk
2 eggs yolks
1/2 cup buffalo wing sauce
1 tbs hot sauce
2 cups chicken, cooked and shredded
1/4 cup bread crumbs

Directions
Cook macaroni al dente and set aside.
In a large pot, melt the butter on low heat and add flour. Add mozzarella and crumbly blue cheese, and stir until completely melted. Pour in salt, pepper and milk and heat on high for 3-4 minutes until the mix is fully incorporated. Remove from heat and mix in egg yolks.
In a separate bowl, combine shredded chicken, hot sauce and buffalo wing sauce. Mix well, then transfer into mac n cheese pot. Toss mac n cheese with chicken and spoon into lightly greased mini cupcake tins, pressing down to fill the tins completely. Sprinkle with bread crumbs and bake for 10 minutes. Remove and let cool for 10 minutes before serving.

Monday, June 11, 2012

Curry Chicken Soup with Sweet Potato and Coconut


I've taken a brief hiatus from blogging for a bit in lieu of doing lots of fun traveling, but I plan to come back with a vengeance! I only have a few weeks left in New Jersey before finishing my internship at Johnson & Johnson and moving back to Boston for summer classes. It's very bittersweet, but I want to make the most of my last days and am looking forward to being back with all my Boston friends. In the past few weeks, I've gone away to Syracuse, Boston, Chicago, Atlantic City, and am heading to Cleveland this weekend to visit Dylan one last time. Believe it or not I've still done some yummy cooking but haven't had the time to capture it all - which I'm very mad at myself for. Time to get back on the horse!

This soup reminds me of my mom because she loves Indian food and it's comprised of all her favorite things. I made it right before going home for Mother's Day and promised my mom I would give her the recipe. A lot of people don't love curry, but if you are a fan then you'll love this soup. The sweet potato and coconut subdue the curry powder and all the ingredients create a delicious blend of Indian flavors. With my love of sweet potato, I was just happy to think of a recipe that allowed me to eat more of them! Hope you enjoy and look for more recipes to come very soon. :)


Curry Chicken Soup with Sweet Potato and Coconut
Serves: 6   Prep: 1 hour  Total: 2 hours

Ingredients
2 sweet potatoes
4 cups chicken stock
1 cup coconut milk
1 lb chicken breast tenderloins
1 tbs fresh ginger
2 cloves fresh garlic
1 tsp curry powder
3/4 cup chopped yellow onion
Salt and pepper
Toasted coconut for garnish

Directions
Preheat oven to 375 degrees. In two separate dishes bake the sweet potatoes for 45 minutes, then the chicken breast tenderloins for 30 minutes. When the sweet potato is done, scoop out the insides and set aside.
In a large pot, combine a little oil, chopped onion, garlic, ginger, curry powder, salt and pepper. Cook at medium heat until the onions have softened, approximately 3-5 minutes. Add the sweet potato and chicken stock, and bring to a boil and reduce by half. Bring to a simmer and add coconut milk and chopped chicken. Heat for another few minutes, then top with toasted coconut to serve.

Tuesday, May 8, 2012

Homemade Take-out Sesame Chicken


Alright, let's be real. I'm a college student, thus I love any food that falls under the category of "take-out". However, I also love to cook and I'm really cheap so making my own Chinese takeout has been an aspiration of mine for some time. When I stumbled across this recipe it was like the stars had aligned. I found it under a list of Martha Stewart's lighter versions of comfort food, so it takes all the guilt out of take-out and doesn't burn a $10 hole in my pocket per serving.


I made a whole batch to eat all by myself and I'm not sick of it yet. This recipe would also be great for a crowd but... why share?


Homemade Take-out Sesame Chicken (from Martha Stewart)
Serves: 4  Prep: 40 minutes  Total: 40 minutes

Ingredients
3/4 cup brown rice
1 cup broccoli, chopped
1 lb skinless, boneless chicken tenderloins
3 tbs honey
2 tbs sesame seeds
2 tbs soy sauce
1 garlic clove, minced
2 eggs whites
1/4 cup corn starch
Salt and pepper to taste
1/4 cup scallions, diced

Directions
Cook brown rice according to package instructions. In a separate pot, steam chopped broccoli over boiling water until cooked through, about five minutes.
To make the sauce, combine honey, sesame seeds, soy sauce and minced garlic in a small bowl. Set aside.
In another bowl, whisk egg whites, corn starch, and salt and pepper. Chop chicken into two-inch chunks and toss in egg mixture. Heat oil in a skillet on medium heat and fry chicken, flipping every 2-3 minutes until fully cooked. When done, add sauce, broccoli and diced scallions into the skillet and heat for another few minutes. Serve over brown rice.
Related Posts Plugin for WordPress, Blogger...